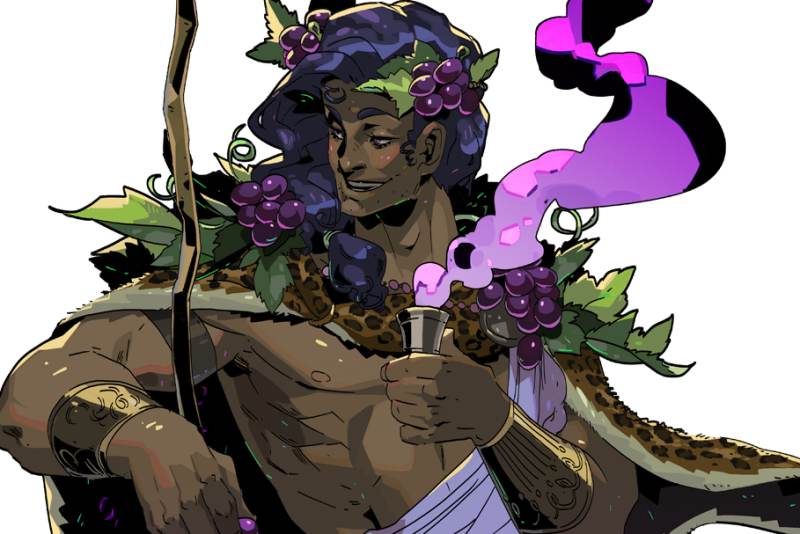
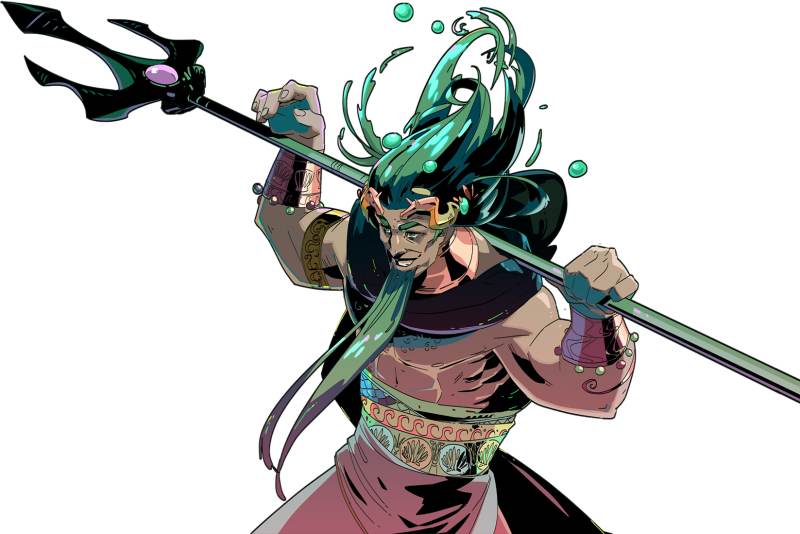
Dionysus is by far my favourite concept for a god, but admittedly he really isn’t the strongest god and can often be ignored unless player are focussing on using the Mirror of Night’s Privileged Status, which I strongly recommend.
Even though Dionysus isn’t the strongest god to select I do have to say his Boons are very good for dealing supplemental damage and is especially useful when players are learning to kite.
The best part to Dionysus is that players can apply DOTs (Damage over time) to multiple enemies and can essentially hop around an encounter dealing substantial damage without hitting an enemy multiple times.
Honestly, I never turn down Dionysus unless it’s for a primary god as if players have Dionysus’ Boons on a rapid attack they will deal some really great damage simply with the DOTs.
Dionysus’ DOTs work best on multiple mobs and kind of fall of for bosses, though they can still be useful as damage is damage at the end of the day.
Dionysus’ DOT is called Hangover which will last for 4 seconds and can be stacked 5 times to deal more damage.
Dionysus can provide players with some nice stuns, slows, heals, health and damage reduction alongside his Hangover, though not usually combined.
Note: Watch me play Hades and similar games on Twitch! Always happy to answer questions there!
OLYMPIAN AFFINITY
Dionysus, being one of the many Olympian gods will have the ability to gain Affinity with a player.
Players can gain affinity by trading in Nectar to him and upon providing the first gift, he will provide a player with his Keepsake the Overflowing Cup.
At first players will want to hold off on providing Dionysus too much Nectar as he will not provide players with any further rewards and players are recommended to farm for Companions, though when a player has enough Artifacts to waste, they can do so, being able to max him out at 7 Hearts.
To gain full favour with Dionysus, players will have to force bonds with at least 6 characters and will need to provide a minimum of 10 Ambrosia to any number of character.
DIONYSUS TIER 1 BOONS
Dionysus’ Tier 1 Boons do not require players to have any other Boons and always have the ability to show up regardless of how many Boons a player has access to.
Players should be cautious of taking too many Tier 1 Boons, especially if they are on the hunt for Legendary Boons, so making yourself aware of which Boons you will need to get the Tier 2 Boons you want is going to be very important, otherwise players may lock themselves out of the Boons they require.
DRUNKEN STRIKE
Dionysus’ Tier 1 Boons do not require players to have any other Boons and always have the ability to show up regardless of how many Boons a player has access to.
Players should be cautious of taking too many Tier 1 Boons, especially if they are on the hunt for Legendary Boons, so making yourself aware of which Boons you will need to get the Tier 2 Boons you want is going to be very important, otherwise players may lock themselves out of the Boons they require.
DRUNKEN FLOURISH
Drunken Flourish is going to be the best way to introduce players to Dionysus.
Drunken Flourish will allow players to quickly affect enemies with Hangover using their Attack and while very useful, doesn’t actually need to be the way that players apply Hangover.
I admittedly really like Drunken Flourish for its ease, though as Hangover only has a maximum of 5 stacks, players can choose to combine it with a slower attack and still achieve a stack of 5 relatively easily.
Essentially, Dionysus sits in between characters like Demeter, who needs a rapid attack to apply Chill effectively, and Aphrodite, who needs a single shot to get the maximum out of her Charmed.
I would say Dionysus goes both ways for which ability to use as at the end of the day it’s most important that players are able to get Privileged Status if they are running it through the Mirror of Night.
At the end of the day, Drunken Strike isn’t going to deal the most damage, though players can amplify this damage by stacking Hangover 5 times, essentially dealing 5 times the damage.
The different rarities of Drunken Strike will raise the damage of Hangover’s base, which is what is multiplied when stacked multiple times:
COMMON
The Common Drunken Strike will cause 4 Hangover Damage every 0.5 seconds per every stack applied.
RARE
The Rare Drunken Strike will cause 5 Hangover Damage every 0.5 seconds per every stack applied.
EPIC
The Epic Drunken Strike will cause 6 Hangover Damage every 0.5 seconds per every stack applied.
HEROIC
The Heroic Drunken Strike will cause 7 Hangover Damage every 0.5 seconds per every stack applied.
DRUNKEN FLOURISH
Drunken Flourish tends to be my go to for applying Hangover, especially if I’m trying to pair Dionysus up with Demeter as I’d prefer Demeter be on my regular attack.
Essentially with Drunken Flourish players will apply Hangover when using their Special, which tends to be a bit slower than the Attack, but at the end of the day the hang over deals the same amount of damage over time.
Drunken Flourish works best for Weapons like the Heart-Seeking Bow, which has a very quick Special that can apply Hangover on many enemies. The Shield of Chaos is also a great choice for this.
A great way to choose when to use Drunken Flourish can also be if the Weapon you’re currently running has low Special Damage. As Drunken Flourish doesn’t provide a percentage upgrade to a player’s Special and essentially provides base damage, it’s very good for low damage Specials, especially if players can quickly apply it onto multiple enemies.
Each rarity of Drunken Flourish will provide players with more damage to their base Hangover stat, being:
COMMON
The Common Drunken Flourish will cause 5 Hangover Damage every 0.5 seconds per every stack applied.
RARE
The Rare Drunken Flourish will cause 6 Hangover Damage every 0.5 seconds per every stack applied.
EPIC
The Epic Drunken Flourish will cause 7 Hangover Damage every 0.5 seconds per every stack applied.
HEROIC
The Heroic Drunken Flourish will cause 8 Hangover Damage every 0.5 seconds per every stack applied.
TRIPPY SHOT
Trippy Shot is such a hit and miss Boon for me and while admittedly powerful, I have to admit that I don’t often choose it unless a better Boon doesn’t reveal itself.
Essentially Trippy Shot will change the way that a player’s Cast works and will allow players to send out an AoE that deals damage and stuns enemies every 0.25 seconds.
Trippy Shot is a great protection for players and deals a good deal of damage, I just prefer to have Casts that I can lodge into enemies so I can proc Privileged Status
Trippy Shot lasts for 5 seconds and cannot be combined with the Aspect of Beowulf.
The different rarities of Trippy Shot will provide players with extra damage being:
COMMON
The Common Trippy Shot will deal 100 AoE damage.
RARE
The Rare Trippy Shot will deal 120 AoE damage.
EPIC
The Epic Trippy Shot will deal 140 AoE damage.
HEROIC
The Heroic Trippy Shot will deal 160 AoE damage.
TRIPPY FLARE
Trippy Flare is the Aspect of Hera and Aspect of Beowulf exclusive Boon and deals more damage than Trippy Shot.
There is quite a bit of of a difference between the two Boons as Trippy Flare will damage foes around the player versus requiring the player to lob their Cast to damage enemies.
Trippy Flare is especially useful for the Shield of Chaos/Aspect of Beowulf, though realistically I think it’s a great Boon to have in general.
Trippy Flare will not stun enemies, however, the higher the rarity the more damage it will deal to enemies around a player, being:
COMMON
The Common Trippy Flare will deal 120 Damage around the player whenever they Cast.
RARE
The Rare Trippy Flare will deal 144 Damage around the player whenever they Cast.
EPIC
The Epic Trippy Flare will deal 168 Damage around the player whenever they Cast.
HEROIC
The Heroic Trippy Flare will deal 192 Damage around the player whenever they Cast.
DRUNKEN DASH
Drunken Dash is one of the fastest ways to apply hangover to an enemy and while not the worst Boon to place on your character, I can’t say that I’m absolutely in love with it.
Essentially, due to how easy it is to apply Drunken Dash it’s going to deal a lot less damage than the other Boons that apply Hangover.
I would strongly recommend Drunken Dash if you are struggling to apply Status Curses and just need a quick way to proc Privileged Status.
Drunken Dash will apply Hangover to all enemies nearby the player whenever the player Dashes.
Each rarity of Drunken Dash will deal more damage over time, being:
COMMON
The Common Drunken Dash deals a base damage of 2.
RARE
The Rare Drunken Dash deals a base damage of 3.
EPIC
The Epic Drunken Dash deals a base damage of 4.
HEROIC
The Heroic Drunken Dash deals a base damage of 5.
DIONYSUS’ AID
By far my least favourite Dionysus Boon is Dionysus’ Aid.
I’ll be honest, I can never think of a time where this is the best choice for players to choose, though it can be pretty powerful if players have no other choice.
Essentially, my reason I don’t like Dionysus’ Aid is because it’s an AoE Hangover effect that requires players to wait for damage to be taken versus immediately bursting them down.
Admittedly, this can be useful in regular encounters where players are being overwhelmed by hoards of enemies, especially in the fourth area, however, I tend to focus my Boons around Bosses versus typical instances.
In short, a player will be able to inflict Hangover to foes around them for 1.5 seconds when using lesser charges and with a full gauge will be able to afflict Hangover for 9 seconds.
Note, the Hangover will last it’s regular duration, however, the player will be able to continuously afflict enemies for these durations.
Players will be able to affect enemies in a 600 range in both instances.
Players will deal more base Hangover damage based on the rarity of their Dionysus’ Aid, being:
COMMON
The Common Dionysus’ Aid will deal 15 damage per each stack every 0.5 seconds.
RARE
The Rare Dionysus’ Aid will deal 16.5 damage per each stack every 0.5 seconds.
EPIC
The Epic Dionysus’ Aid will deal 18 damage per each stack every 0.5 seconds.
HEROIC
The Heroic Dionysus’ Aid will deal 19.5 damage per each stack every 0.5 seconds.
AFTER PARTY
After Party is a great Boon to have if players are struggling with staying alive in their escape attempts, though I’ll be honest I rarely need it.
Essentially with After Party players will be able to always guarantee that they have a certain threshold of health after they leave an Encounter.
The Life Threshold will depend on the Lasting Consequences and After Party cannot be upgraded using Poms.
It should also be noted that players will only be able to get the Heroic version of After Part if they use Ambrosia Delight or Rare Crop.
The following are the Life Thresholds for each rarity of After Party:
COMMON
The Common After Party will provide players will leave players with at least 30% of their Health after an Encounter.
RARE
The Rare After Party will provide players will leave players with at least 37.5% of their Health after an Encounter.
EPIC
The Epic After Party will provide players will leave players with at least 45% of their Health after an Encounter.
HEROIC
The Heroic After Party will provide players will leave players with at least 60% of their Health after an Encounter.
POSITIVE OUTLOOK
Positive Outlook is a Boon I don’t really ever take, though it cane be great for players who are playing with God Mode on.
I’ll be honest, Positive Outlook is not a favourite for a few reasons. Firstly, there are quite a number of other Boons that work in a similar fashion as Positive Outlook, providing players with a set amount of Damage Resistance, but unlike Positive Outlook, players will not need to be at 40% health or below in order to activate it.
If players are in need of some extra defense in their run, go for it, but in most cases you’re going to want to avoid Positive Outlook.
The different rarities of Positive Outlook will provide players with more Damage Resistance when below 40% health, being:
COMMON
The Common Positive Outlook will provide players with 10% Damage Resistance whenever players are under 40% health.
RARE
The Rare Positive Outlook will provide players with 15% Damage Resistance whenever players are under 40% health.
EPIC
The Epic Positive Outlook will provide players with 20% Damage Resistance whenever players are under 40% health.
HEROIC
The Heroic Positive Outlook will provide players with 25% Damage Resistance whenever players are under 40% health.
PREMIUM VINTAGE
Premium Vintage is a great Boon to have whenever players are doing Artifact runs as it will reward players with Health anytime they pick up Nectar.
If players are not doing Artifact runs I strongly suggest against running it, because it won’t be useful in most circumstances.
Premium Vintage is going to have to be a decisive option for players as they will not be able to sell this Boon or be able to upgrade it with Poms.
The different rarities of Premium Vintage will provide players with more Health when a player picks up Nectar, though no matter what rarity players will always receive a single Nectar for selecting Premium Vintage.
Premium Vintage is only useful if selected at the beginning of a run and will provide players with the following Life per tier:
COMMON
With the Common Premium Vintage players will obtain 20 Health anytime they pick up Nectar.
RARE
With the Rare Premium Vintage players will obtain 25 Health anytime they pick up Nectar.
EPIC
With the Epic Premium Vintage players will obtain 30 Health anytime they pick up Nectar.
HEROIC
With the Heroic Premium Vintage players will obtain 35 Health anytime they pick up Nectar.
STRONG DRINK
Strong Drink is by far my favourite Dionysus Boon to ever get beccause it both provides players with better healing whenever they are at a Fountain and it will also provide players with a percentage of extra damage on all their forms of damage.
While the damage increase isn’t the most significant, if players get Strong Drink early on, they can expect at least 10 or so Fountains and at the end of the day, with Strong Drink players will heal 100% of their lives by using a Fountain, being the most significant part of Strong Drink.
It should be noted that if players have Lasting Consequences, the Health players receive from fountains may be less than 100%.
Players will also not be able to upgrade Strong Drink with Poms.
The different rarities of Strong Drink will provide players with more bonus damage for each Fountain they use, being:
COMMON
The Common Strong Drink provides players with a bonus of 3% damage every time they use a Fountain.
RARE
The Rare Strong Drink provides players with a bonus of 4% damage every time they use a Fountain.
EPIC
The Epic Strong Drink provides players with a bonus of 5% damage every time they use a Fountain.
HEROIC
The Heroic Strong Drink provides players with a bonus of 6% damage every time they use a Fountain.
DIONYSUS TIER 2 BOONS
Tier 2 Boons Dionysus Boons will require players to unlock at least one other Boon in order to acquire. Many of these Boons require any of the Tier 1 Boons though some will require a specific Boon in order to obtain.
The following is all the information you need to know about the Tier 2 Dionysus Boons.
BAD INFLUENCE
Bad Influence is a great Duo Boon, especially for those who are relying on their Hangover to deal damage to enemies.
Honestly, Bad Influence is going to very easy to active as it will only require players to apply Hangover on 3 enemies in order to deal more damage.
Players will need Drunken Strike, Drunken Flourish, Drunken Dash, or Dionysus’ Aid before they can acquire Bad Influence, though any of them should be good enough to regularly activate it.
With the different rarities of Bad Influence, players will be able to deal more bonus damage when 3 enemies are inflicted with Hangover, being:
COMMON
The Common Bad Influence will provide players with 50% bonus Hangover Damage anytime 3 mobs are afflicted with Hangover.
RARE
The Rare Bad Influence will provide players with 1.3-1.5x bonus Hangover Damage anytime 3 mobs are afflicted with Hangover.
EPIC
The Epic Bad Influence will provide players with 1.8-2.0x bonus Hangover Damage anytime 3 mobs are afflicted with Hangover.
HEROIC
The Heroic Bad Influence will provide players with 2.3-2.5x bonus Hangover Damage anytime 3 mobs are afflicted with Hangover.
NUMBING SENSASION
Numbing Sensation is going to be one of the defensive Boons that players can receive, though I strongly recommend against using it as it doesn’t really help very much.
Essentially Numbing Sensation is going to slow down any enemy affected by Hangover, allowing players to deal more damage to an enemy before the enemy gets close to a player.
I would say at most players would want to have Numbing Sensation on a Weapon like the Heart Seeking Bow, but otherwise it’s not the most useful.
Players will need Drunken Strike, Drunken Flourish, Drunken Dash, or Dionysus’ Aid in order to get Numbing Sensation.
The different rarities of Numbing Sensation will help slow down enemies further, being:
COMMON
The Common Numbing Sensation will slow down enemies by 15% when affected by Hangover.
RARE
The Rare Numbing Sensation will slow down enemies by 1.3-1.5x when affected by Hangover.
EPIC
The Epic Numbing Sensation will slow down enemies by 2.0-2.2x when affected by Hangover.
HEROIC
The Heroic Numbing Sensation will slow down enemies by 2.5x when affected by Hangover.
PEER PRESSURE
With Peer Pressure players will be able to spread Hangover quickly and efficiently, reminding me a lot of the old Summoner in FFXIV.
Essentially players will be able to contaminate nearby enemies with Hangover every 4 seconds.
While the contamination takes a bit of time in order to actually take place, players are going to deal a lot more damage this way, especially if enemies are congested.
I don’t always recommend this Boon to be honest, because I don’t find it the most difficult thing to apply Hangover on almost all the mobs on the field, but the option for you is there.
Peer Pressure has it’s own version of Hangover damage and can stack some extra damage onto mobs, which is one of the biggest perks.
Players will need the one of the following Boons to acquire Peer Pressure: Drunken Strike, Drunken Flourish, or Drunken Dash.
The different rarities of Peer Pressure will increase the damage that is dealt with Peer Pressure, being:
COMMON
The Common Peer Pressure will deal an extra 4 damage using Hangover.
RARE
The Common Peer Pressure will deal an extra 1.3-1.5x damage using Hangover.
EPIC
The Common Peer Pressure will deal an extra 2.0-2.5x damage using Hangover.
HEROIC
The Common Peer Pressure will deal an extra 2.5-2.7x damage using Hangover.
HIGH TOLERANCE
With High Tolerance players will be able to provide themselves with some Damage Resistance. While I’m not the biggest fan of Damage Resistance Boons, I do think that they run pretty well with the Aspect of Arthur.
Realistically, players can really get away with never using High Tolerance, though it does help when players can quickly run into a Festive Fog to defend themselves.
Players will either need Trippy Shot or Tippy Flare to acquire High Tolerance and will receive the following Damage Resistance based on their rarity of High Tolerance:
COMMON
The Common High Tolerance will provide players with 10-15% Damage Resistance when they stand in Festive Fog.
RARE
The Rare High Tolerance will provide players with 1.3-1.5x Damage Resistance when they stand in Festive Fog.
EPIC
The Epic High Tolerance will provide players with 2.0-2.5x Damage Resistance when they stand in Festive Fog.
HEROIC
The Heroic High Tolerance will provide players with 2.5-2.7x Damage Resistance when they stand in Festive Fog.
DIONYSUS TIER 3 BOONS
Dionysus’ Tier 3 Boons is fairly rare to acquire and will only come in a Black Out.
Admittedly, Black Out is such a powerful Boon to run, especially if players are dealing a good amount of damage with Hangover already.
Essentially, players are able to combine both Hangover and Festive Fog. While I’m not always a huge fan of Festive Fog, I will always prioritize getting Black Out if I ever have the Boons to do so.
Players will need two of the following Boons to unlock Black Out:
Drunken Strike, Drunken Flourish, Drunken Dash or Dionysus’ Aid
Trippy Shot / Trippy Flare
BLACK OUT
Black Out will deal 60% extra damage when enemies have Hangover and are in the Festive Fog.
DUO BOONS
As I’ve already written a Duo Boons guide, I’m not going to go too deep into this.
Essentially players will want to obtain either Demeter, Poseidon, Zeus, Athena, Aphrodite, Artemis or Ares Boons in order to acquire a Duo Boon, though I strongly recommend selecting only one or two of these god’s Boons in order to raise your chances of gaining access to a Duo Boon.
The only Duo Boons I really love are between Ares and Dionysus, Athena and Dionysus, Demeter and Dionysus, Poseidon and Dionysus, and Zeus and Dionysus.
Similar to Demeter, Dionysus is a great god to have as a sub because of his bonuses.
Leave a Reply