I’ve gotten oddly invested in completing Challenge Logs this month and have been consistently getting the 1,500 Gil Reward for completing 30 Challenge Logs a week without putting in my effort. My husband was extremely concerned at first, telling me that I was doing too much in the game and needed to take a step back until I ended up showing him the tasks I was doing to acquire the reward, which he admitted seemed easy enough.
In reality, while I am logged into FFXIV for the majority of my day, I can’t say that the majority of the time I am actively focussing on the game and instead am passively doing chores that help progress the content I’m trying to work towards. While I do prefer to be more engaged in the game and regularly completing battle-oriented content, the reality is that I’m extraordinarily lucky to even be able to be logged into the game while working and cannot allow myself to let my work ethic faulter for the sake of being able to do something in the game.
It was actually this that made me realize how easy it could be to complete 30 Challenge Logs and get that bonus 55,000 Gil, not including whatever Gil you get from the unique Challenge Logs if they reward Gil.
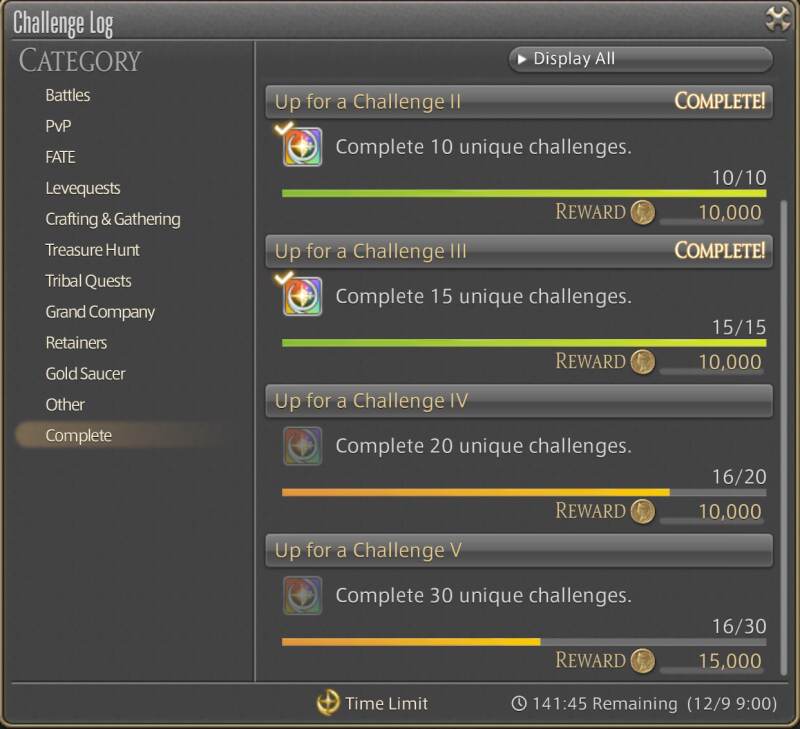
Now, the reality is that completing Challenge Logs is not going to be the most profitable endeavour for players, however, it’s always a good idea to finish off a tier especially when you are close as you would be missing out on 10,000-15,000 Gil for a task that can take as little as 10 minutes.
The focus of this guide is not going to be to encourage players to complete 30 Challenge Logs each week, however, it will be to let players know what Challenge Logs can be done passively with very little effort or to remind players of tasks they used to complete that benefitted them in this regard and have simply forgotten exist.
Note: If you have any questions about FFXIV that you want me to cover feel free to leave them in a comment below, you can also ask me while I am streaming on Twitch, YouTube or in our community discord.
WHY COMPLETE CHALLENGE LOGS?
There are several reasons players will want to complete Challenge Logs including generous amounts of experience to level up your Battlecraft Jobs, passive ways to level your Crafters and Gatherers, easy and consistent ways to get special currencies like PVP Wolf Marks and the Gold Saucer’s MGP and of course, a great deal of Gil.
In my opinion, the biggest plus sides to doing Challenge Logs have to do with MGP and the big Experience Boosts as these two rewards tend to be the most grindy in FFXIV and Challenge Logs give a substantial amount of each.
Although Gil isn’t something I find difficult to make, being that I have multiple sources that I outline here, it is nice that I get a few thousand for completing tasks I’m already doing in the game, making the less profitable tasks feel much more worth it.
WHAT DO I GET FOR COMPLETING CHALLENGE LOGS?
Each Category of Challenge Log will provide players with different rewards that are associated with the category.
Battle will provide Experience and Gil
PVP will provide Wolf Marks
FATE will provide Experience and Gil
Levequests will provide Experience and Gil
Crafting & Gathering will provide Experience and Gil
Treasure Hunt will provide Gil
Tribal Quests will provide Gil
Grand Company will provide Company Seals
Retainers will provide Gil
Gold Saucer will provide MGP
Other will provide Experience and Gil in Eureka the Forbidden Land as well as Sea Cowries for Island Sanctuary
Finally, players will receive a healthy amount of Gil for completing a set number of challenges in any of the categories. These can be mish-mashed so a player never has to feel bound to any content and can simply make their decisions based on what they want to do that week.
I personally change up what I do based on the events that are happening in-game and what kind of content I want to engage in, for example, during the Moogle Tomestone Event I focussed extremely heavily on PVP and worked towards getting all my Series rewards although I had ignored them for the majority of the season. This allowed me to focus less on other Challenge Logs that took extra time and made up for the fact that I haven’t been in a Dungeon in weeks.
Players will receive 10,000 Gil for each 5 Challenge Logs they complete up to 20 Challenge Logs, after this players can do a stretch to complete 30 Challenge Logs, however, they will get 15,000 Gil making the last 10 Challenge Logs less worth it to complete. Still, if players find an easy 10 Challenge Logs to complete this can be very worth it but I’d say your focus should be on the first 20 at least.

WHAT CHALLENGE LOGS SHOULD I FOCUS ON
This section will be split up into multiple parts and will be categorized based on what content you are completing/goals you are working towards. This section will completely ignore the “Other” tab as if you’re going through Eureka the Forgotten Land you’re just going to passively get most of these and if you have Island Sanctuary unlocked you will typically get both of these Challenge Logs each week without even trying.
Before I begin this section I just want to say if you find Island Sanctuary difficult to get through either because you don’t know what to ship or you can’t manage to get it to passively function on its own feel free to join our discord. Not only do we have players to help you figure out how you can change your methods of Gathering to ensure you only need to visit your Island once a day and put in no effort, but we also have daily shouts that tell you the items you should craft daily for maximum Cowries.
I will also not be covering any of the PVP Challenge Logs as this is considered niche content and players who tend to enjoy PVP will most likely complete these weekly without trying.
Alright, time to get started on the challenge logs you should complete!
BATTLE CHALLENGE LOGS (6 EASY POINTS)
For the most part Battle Challenge Logs are going to be the ones you will most consistently complete each week. You can easily score 6 points with these in a day, though this does mean being aware of everything that is in that category.
A few of these will require you to go out of your way to complete though realistically I recommend you complete them each week anyway as they are terribly easy to complete and they will tie to other boosts of experience you will want to focus on for speed and efficiency.
In my opinion, if you have side jobs you still need to level up the following Challenge Logs are extremely good to focus on as they provide you with some of the fastest experience and I’ve covered what order you should do them in my speed levelling guide.
FEELING LUCKY
Chances are Feeling Lucky is going to be the first Challenge Log you complete each week. This only requires players to complete 3 Dungeon Roulettes which even Endgame players do to get their Tomestones for the week.
Roulletes that are Elligible are:
Expert
Level 90 Dungeons
Level 50/60/70/80 Dungeons
Levelling
Main Scenario
DUNGEON MASTER
Dungeon Master is a lot easier to complete as it can be done while a player is unsynced. While I don’t advise this ever, it is good to know in case you don’t have a lot of time to play that week.
Players will simply need to complete 5 Dungeons of any level and they do not need to be in a Roulette. If you’re trying to speed through this unsynced I would recommend still running it on a job that is not at the maximum level but a Dungeon that is well under it’s player level. So if you’re Level 60, run a level 40 or below.
This is also perfect for players who are trying to farm a specific glam or Triple Triad Card from a Dungeon, especially if you have already levelled up all of your Jobs and are collecting Tomestones in other ways. I did this during the Moogle Tomestone event since I only played PVP unless a community member needed me to run a Dungeon with them and I used the time to try to get Triple Triad Cards I was missing.
EXERCISING THE RIGHT
Exercising the Right is by far the absolute easiest challenge log to complete each week and is typically one that I accidentally trigger even when I’m trying to “save” it for a job I want the EXP on.
I’m personally someone who commends someone after every Duty unless there were no players at all who I think deserved it, which is very rare.
This can be done in the majority of content including PVP, though will not be possible in instances like Bozja, Palace of the Dead or Eureka.
BOSOM BUDDIES I
It might be weird to hear me say that Bosom Buddies is easy to complete, but if you didn’t know I am a firm believer that every single player should take the time to get their Chocobo Companion to max level.
Players will only need to kill 20 mobs with their Chocobo summoned to get this Challenge log done. This is most easily done when doing FATEs or by doing Hunts, though I will cover more on this when we get to the FATE section.
BOSOM BUDDIES II
Bosom Buddies II is essentially the same as Bosom Buddies I but you will need 100 Mobs killed. If you are planning on completing daily hunts throughout the week this typically covers it, but again you can also do this through FATEs faster.
TAILS OF DERRING-DO BAD AND GOOD LUCK
If you don’t know what Wondrous Tails are, you need to get started now. Hands down with absolutely 0 questions asked, this is the most optimal way to level even if you are planning on playing extremely few hours in FFXIV that week.
I would argue that players do themselves a massive disservice if they are not actively finishing these each week because the rewards are just so significant.
When it comes to Tails of Derring-Do Bad and Good Luck, you will only need to complete 3 of the 9 Seals required for Wondrous Tails, so if Challenge Logs are all you care about, you’re set very early
That being said, anything that is on your Wondrous Tails can be done unsynced and I will typically get at least 4-5 seals within 30-minutes of it being released since I’ve gotten a number of the tasks down to 14-30 second kills.
This will not be possible for players who are below level 70 for the most part, but players can make parties with friends to speed run through these.

FATE (2 EASY POINTS)
Listen, none of us actually feel engaged when we do FATEs, but many of us will stomach FATEs for rewards like Bicolour Gemstones.
Even I, who consistently finds myself running FATEs to finally get the mount that costs 50,000 Gemstones feels like this is a necessary Evil for completionist behaviours and not a means of finding joy in the game.
Now, this might be an already known fact to you, but you never have to complete FATEs that are around your level to get this achievement and instead can go to the lowest level area to spam FATEs quickly.
I typically get these both done in about 10 minutes tops, but if I’m in the mood to farm FATEs at my level I will do ones that provide me with Bicolor Gemstones.
I strongly recommend completing these each week if you are still levelling up side jobs since they give a decent amount of EXP.
Note: If you are going to complete these Challenge Logs I strongly recommend you have your Chocobo out. Unless you focus on only Boss FATEs, the chances of you killing 100 mobs is extremely, extremely likely and if you haven’t already levelled your Chocobo to max you’re missing out on a lot of experience.
IN YOUR FATE I
In Your Fate I requires players to complete 5 FATEs with the highest rating.
IN YOUR FATE II
In Your Fate II requires players to complete 10 FATEs with the highest rating.

LEVEQUESTS (1 EASY POINT & 1 MODERATE POINT)
As easy as Levequests are, I would only recommend farming these if you are working on levelling a Crafter or a Gatherer. Though before level 50 players can do Levequests to level up their Battlecraft Jobs, they simply take too much time and effort for the experience reward and would be a very niche thing to complete.
I do still recommend them for levelling up Battlecraft Jobs if you can’t find groups of friends to hang out with and do content with or if you are experiencing very long queue times, but they’re speedier on Crafters.
Now, extremely lazy players can purchase turnins on the Market Board, though as a fair warning depending on the server you are on these can range from 100 Gil each to 80,000 Gil each. On my server, the majority of turn-ins are ridiculously inexpensive and while that wasn’t always the case, there have been a good amount of instances where I’ve realized that the turn-ins are even cheaper than the Gil you get from turning in the Levequest.
Admittedly, I haven’t done a deep dive on how common this is and how many servers this is true for and chances are what I am seeing is due to where we are in the current expansion, but I digress.
JUST LEVE IT TO ME
Players will need to complete 5 Levequests with different Plates. This may be tricky to spot if you’re not used to Leves, but essentially each Leve that you accept will have a Plate above it. Though some are more common for each Job, depending on the area you are in you will tend to find 2 or 3 different plates for the same Job.
As this is a topic that has a lot of information and varies based on what level leve you are doing and what job you are doing it on, I’m going to link you to the Guildleve Wiki post.
I wouldn’t think too hard about this and would honestly only do Leves if you are levelling up a crafter as you can either mass produce an item to turn in whenever you can. Gatherers are fine when it comes to Levequests, but they definitely take a lot more effort. I’ve been doing a lot recently for research and my main problem is the fact that you cannot auto-gather and instead have to click anytime you want to gather an item.
MAKING LIKE A TREE
Making Like a Tree while relatively easy takes the most effort. If you are using Leves to level up a job you’re going to hit it no matter what, however, if you are completing it just to get the challenge log done and over with, it’s not worth it.
I completed the highest level Gatherer ones for a few days to see how much Gil I could make and while it was a substantial enough amount (being about 2,000 Gil per Leve) I ultimately stopped because I couldn’t do it as passively as I hoped I could and at this point all of my Gil ventures are done while I’m working so the less focus I need to give something, the better.

CRAFTING & GATHERING (10 INCREDIBLY EASY POINTS)
I won’t lie, the reason I wrote this guide was because my brother-in-law said he was interested in getting his Crafters and Gathers levelled up and then immediately said “Well that would be so difficult to do.”
Realistically, if you are fine with a very slow levelling process you can get both your Crafters and Gatherers up only using weekly Challenge Logs. The thing is, this will be incredibly slow and would not be suitable for players who want to get their hands on the Marketboard.
Otherwise the following are the easiest ways to get these tasks completed.
CRAFTING UP A STORM
I’m shocked this is the case, but Crafting Up a Storm requires players to craft 30 items and it doesn’t matter what level they are… so… here’s my tip.
Craft Dye.
Not only is it incredibly easy to craft as Dyes cost one item (plus Crafting Crystals), but loads of Dyes cost a decent amount on the Marketboard. Dyes are especially in demand on servers that have few Crafters as well as RP servers and have a Market Value of tens of millions each week.
Admittedly most Crafters who are trying to make high amounts of Gil shy away from crafting dyes as they can better utilize their time, but for levelling and for wanting to make some Gil for low effort, nothing could be more perfect.
Ever since I started Crafting I’ve done this every week to level up any Crafters I didn’t get to and would finish them off with Beast Tribes. You see, every craftable Dye can be made will all crafters and depending on how the Marketboard is doing you can change what colour Dye you’re making while still using the same Pigment.
Of all the resources to sell on the Marketboard, Dye has the most consistent Market and though you won’t be making massive amounts of Gil and chances are you will have all the Dye you crafted out of your inventory in a few days.
If you are only interested in getting this Challenge Log entry done you can simply quick synthesis 30 Dye each week.
As a closer to this challenge log, players should be aware that if they are running Beast Tribes for Crafters they will typically hit this Challenge Log each week. Now, this is a bit risky if you care about the experience you get from this Challenge Log as typically a player will use a higher level Crafter to Craft the item they want to turn in and multiple weeks of getting this challenge log on the wrong Crafter made me not care about the experience anymore.
Admittedly, this becomes less of a big deal when you are 10 levels towards maximum anyway as the amount of EXP you get is reduced.
CRAFTING UP A STORM (HQ) – Extremely Optional
To get Crafting Up A Storm (HQ) players must craft a total of 20 HQ items. I completely understand if you are a player who doesn’t want to complete this Challenge Log each week as not even Beast Tribes tend to cover it.
Still, the Easiest way to get this done is to craft Dyes. While Dyes do not come out as actually HQ, if a player hits 100% HQ while crafting it will still count as HQ. I will say if you are hoping that you can quickly synthesize 30 Dyes and still get 20 HQ this is pretty improbable. Even with Level 90 Scrip Gear, I get more NQ than HQ items, even if I’m well over their level and only have to hit 2 buttons to craft a perfect HQ item under level 80.
I’d say this one is one that you may want to avoid until you can quickly hit a few buttons to craft a HQ Dye and you may even want to wait until the end of the week when you’ve done all of your Beast Tribes and finish this off with a couple of Dyes if you only need 1-5 more HQ crafts.
If you’re a true min-maxer who wants to get this done on your lowest-level crafter each week I would strongly suggest making a macro you can hit each time you want to craft Dye. I will say, this tends to be more effort than it is worth and I personally only started focussing on this Challenge Log when I had things like Relics to work on or was selling HQ resources on the Marketboard.
MY BIG BREAK
I stroooooooooongly recommend every player does this whether or not you are planning on crafting or not.
This is by far the easiest Challenge Log to get in the game ever and it only takes you having a Crafter that can desynthesize Gear.
In all reality, a player doesn’t even need to be on their Crafter in order to get this Challenge log done but I do strongly recommend swapping onto a Crafter when you’re planning on doing it as they are the only Jobs that will get experience from the Challenge Log.
Players will need to Desynthesize 5 pieces of Gear in order to get this Challenge Log completed and if players run a maximum of 2 Duties the chances of them having these sitting in their inventory by the end are incredibly high.
I personally still do this challenge log each week although all of my Jobs are level 90 since Company Seals are incredibly easy for me to get and realistically I have very few things I like spending them on.
I’m not joking when I say, grab a Crafter just to do this Challenge Log even if you never plan on crafting a single day of your life. It will set you forward a huge amount and realistically there’s no excuse not to complete it even if you just desynthesize on a random job.
THE GATHERING STORM
The Gathering Storm is extremely easy to complete, however, I only recommend it for players who are planning to become a Gatherer. For players who have no interest in Gathering at all this will be a bit of a time sink for no reason.
Players will have to Gather 100 items from nodes that are near their level, meaning they will have to be in a 5-level range to whichever Gatherer you are completing it on.
As I am a Crafter I find this ridiculously easy to do and I will typically pick a high-level resource to gather that is selling for at least 600 Gil on the Market Board so I can just dump it when I’m done Gathering. If the intermediary craft sells for much more at normal quality, I will craft these resources to this tier and will sell them for the marked-up price.
The Gathering Storm is especially easy for players who have access to the Diadem and if that is the way you are levelling up your Gatherers you will absolutely hit this each week. It’s typically the least beneficial for players if they are already max level and the resources within the 5-level cap are not selling quickly or for a good amount.
If you are doing Gathering Levequests you will typically get these in a couple of Leves. I strongly recommend this for players who are trying to power-level their Gatherers.
I would always prioritize Crafters over Gatherers as realistically a player will only need to hit nodes within their level range to get a Gatherer up.
A BOON FROM NATURE
A Boon from Nature is a bit more difficult to guarantee and is highly dependent on how good your Gear is on your Gatherer as players will need good enough stats to actually activate the Boon.
Typically if players are only using Vendor Gear they will be able to snag Boons from nodes that are a few levels below them, however, once players get to the maximum level Nodes they will either need Scrip Gear, Materia and/or Crafted Gear depending on how far into the expansion we’re in.
I wouldn’t think too hard about this Challenge Log at least at first. Typically you will activate this without even trying, especially if you are trying to get The Gathering Storm Challenge Log completed.
HOOKED ON THE REELING
I tend to be hit-and-miss about Fishing in video games, though I somehow always find myself doing it always finding myself doing it a lot because you can typically do it with one hand and very little focus.
The same is true of FFXIV and while I don’t find myself fishing as frequently as I am doing other chores, I definitely go through phases especially if I am working on side content that requires it such as the Firmament.
I personally wouldn’t say Fishing is the best Gatherer to have on hand as it doesn’t really bring in much Gil, but for a Job that you can stand still and hit a maximum of 4 buttons it can be a good choice to level up while watching TV if you need to keep your hands busy.
Players will only need to catch 30 Fish in order to get this Challenge Log complete and it doesn’t matter where they get these fish from as level does not matter at all.
The main catch to fishing is that you will need bait and while inexpensive typically players don’t like holding onto it because it takes up an inventory slot. That being said, you can simply buy bait in one of the starting cities and fish there too if you want to get this done quick and easy.
CATCH OF THE DAY
Catch of the Day, while simple requires a bit of knowledge when it comes to fishing or needs a decent amount of RNG luck. Typically players will need to Mooch in order to get larger fish, though this is oddly not always the case depending on where you are fishing. Similar to many of the Challenge Logs above, I would not focus on this one and would just take it I’m working on Hooked on the Reeling.
Obviously, if you are working on levelling your Fisher it would be good to get this each week, though chances are if you are focussing on levelling Fisher you are looking for some of the rarest Fish to sell which will typically land you this Challenge Log anyway.
SPEAR ME
Spear Fishing was one of the more recent changes/additions to Fisher and is one of the fastest tasks a player can ever do. Essentially it will launch a mini-game that allows players to catch fish that swim by and players must trigger their spear to pierce through the fish they want. Players can typically get two Fish at a time during this mini-game and due to the fact that there is no real wait time for fish to spawn, you can complete this faster than regular Fishing. The only issue is, you need to be at least level 61 on your Fisher to unlock this.
Players need to Spear 50 Fish in order to get Spear Me.
Again, I would only do this regularly if you were levelling up Fisher, but if you find it easy and worth it, grab it!
SPEAR NO EFFORT
Spear No Effort is typically as easy as Spear Me, however, it will require players to Spear 20 Large Fish. When playing the little mini-game it will be quite obvious which fish are considered Large though whenever I do this mini-game I just spear whatever, take my rewards, desynth them and call it a day. As you could probably guess, I really don’t care about Fishing for the most part in FFXIV.
THE CUSTOMER IS ALWAYS RIGHT
The Customer is Always Right is a Challenge Log I think all players who craft should complete each week however it’s not for the Challenge Log itself as much as it’s the fact that Custom Deliveries are one of the absolute best ways to get your Crafters levelled and Geared.
I’m personally running out of White and Purple Scrips on a regular basis, mostly because I was putting an extremely heavy focus on unlocking any Folklore and Master Crafting Recipes I haven’t unlocked yet and because I started all of my Crafting Relic Gear that I ignored in previous patches.
While this content is not for everyone, players who are hoping on Crafting, even small amounts will want to get both White and Purple Scrips during their levelling periods as this is similar to Tomestones of Poetics where a player can purchase the second-best Crafting or Gathering Gear of an Expansion.
Players are allowed to complete a total of 12 Custom Deliveries a week, landing them at least a thousand Scrips and if players are only focussed on the Challenge Log they only need to complete 6 of these.
The most awesome part of completing Custom Deliveries is that every single one can be completed with a macro and if you have no use for the Scrips both can be used for items that sell for a pretty penny. This mostly has to do with the fact that players are only able to quickly get these currencies once a week through these Custom Deliveries and if they ever need more it’s a tedious process to farm them on their own.
Seriously, take advantage of this because there’s one big reality to Crafters. They don’t want to farm their own resources, they want to get things done and move along. *cough* trust me. I know.

TREASURE HUNT (1 EASY POINT)
Treasure Hunts can be one of the most profitable ways to make Gil as there is a chance players will get very expensive loot in these instances, though due to the fact that a player will want to complete these in groups, I’m going to leave the Challenge Logs that are associated with the actual instances out of this.
I would still recommend looking at these Challenge Logs as they only require 5 completed Maps a week and depending on your group of friends or FC you may be able to complete those each week. Not to forget, there are regularly Party Finders open in hopes of getting more players into these instances to make them faster.
Whether or not a player gets the Treasure Chest loot from Treasure Maps, they are still extremely profitable for the time spent. My family tends to run them on weekends when we are all free and we see upwards of 100,000 Gil per play session and even more when our luck is good.
X MARKS THE SPOT
The absolute easiest Challenge Log to complete of the Treasure Hunt series is the X Marks the Spot as this only requires players to locate 3 Timeworn Maps a week.
This simply requires players to have a Miner or a Botanist to head around Eorzea and find a node that has the potential for a Treasure Map.
Typically I land on a Map by mistake every day, though realistically this has to do with the fact that I am regularly gathering for resources daily.
In my opinion, it doesn’t really matter what Treasure Map you collect as most sell for a good price, being between 10,000-50,000 Gil. These prices fluctuate a lot during the week, so trying to optimize which Map you try to collect each day isn’t really recommended unless you are the one who is going to use the map and you want to complete a specific one.
Players will only be able to acquire a single Timeworn Map a day by farming a node and you can check when the next map is available in the Timer menu.
Although I personally get a Treasure Map each day, especially since my family regularly completes them you will only need to Gather 3 for the Challenge Log, so if you’re waiting for a queue to pop, why not just attempt?
As a note, you cannot guarantee a node will have a Timeworn map as their spawn is random. While yes the specific nodes will always have the same maps, sometimes you have to run in a circle for a bit before the actual map appears. This is why I personally just gather whatever map I find when I’m gathering the resources I personally need. While yes I could probably make more Gil if I hyper-optimized, the Market fluctuates so much on my server when it comes to maps.
TRIBAL QUESTS (EASY 2 POINTS)
I don’t think you have had to know me long before you’ve heard me repeat time and time again that Tribal Quests are by far some of the most beneficial content a player can ever do in FFXIV.
Though many of the Tribal Quests got nerfed when it comes to experience as the newer expansions came out the biggest perk to these is the free mounts you can get and the many resources you can get by using each Tribe’s Currency.
Recently one of the old Beast Tribes became extremely profitable as one of the items you can buy using their currency shot up in value by thousands. Though this is not always the case, I made myself a few million off their backs since I had saved up thousands of their Currency from my time levelling them up.
I wouldn’t recommend every player do this, because farming up the currency beyond what you need to level or max out the Reputation is somewhat pointless, but typically players will be able to make a few thousand a day simply by completing the most recent 3 Beast Tribes.
Beast Tribes have 3 different types, one for Gatherers, one for Crafters and one for Battlecraft jobs. The ones for Gatherers and Crafters are typically the most worth it as they provide the most experience, though all three can be used to get things like Materia and unique Tribal items that cannot be bought off the Marketboard.
I would strongly recommend that all players at least complete Tribal Quests from Shadowbringers onwards as not only were these nerfed much less when it came to experience, but these were the first to be substantially streamlined, thus only taking a few minutes to complete them all compared to the previous ones which sometimes took minutes each to complete a single one.
I recently went back to try to complete a few Beast Tribe quests from ARR because I needed a few items that could be bought from the Vendors for much less than the Market Board and ended up Abandoning all three quests midway through because it wasn’t worth the time. Admittedly these are much more worth the time when you are also a low-level, but going back to farm them… less so.
TRIBE AND TRUE I
Tribe and True I can be done in a single day with very minimal effort. I personally do this even when my Jobs are at the maximum level and will typically either run the highest level Beast Tribes or will pick a Beast Tribe that has an expensive item that can be purchased with the currency.
During this time I also do the daily hunts that are in that area to get a bit more Gil and Hunt Currency as I typically have something to spend this currency on at all times.
You will only need to complete 5 Tribal Quests, meaning that you can pick between two Beast Tribes to interact with once in a week.
TRIBE AND TRUE II
Tribe and True II is a bit more difficult to obtain and I would only recommend it if you enjoy Beast Tribes or you are levelling up your side jobs. You will need 15 Tribal Quests a week, which realistically is either 3 days of doing 2 Beast Tribes or 2 days of doing 3.
As you are limited to 12 Tribal Quests a day there is no way to complete this in a single go and realistically I only complete this at this point if I need extra Hunt Currency or again, something that can be bought from the Tribal Venders is selling well for me.
This was something I always completed without thinking about when I was levelling up side jobs, but it’s more hit-and-miss these days depending on if I have something more pressing to do.

RETAINERS (1 EASY & 1 MODERATE POINT)
I’ve recently gone on a few deep dives when it comes to Retainers covering topics such as How to get the currency required for Ventures, the fastest way to level your Retainer and what Ventures to send your Retainers on for Gil (including what type or Retainers you want).
I truly think that players do themselves a massive disservice when they don’t send their Retainers out on Ventures. It’s an incredibly easy task to get done and even when a player is not hyper-optimizing what Ventures they are sending their Retainers on they will get a significant amount of Gil. As I’ve covered those topics in depth I won’t rehash, but this is what you need to know about the Retainer Achievement Logs.
VENTURE CAPITAL
If players are playing FFXIV daily they will easily get Venture Capital. This only requires players to send their Retainers on any 10 Ventures and if you are someone who is sending your Retainers on either Quick Explorations or Hunting/Mining/Botany Ventures chances are you will get this in a day.
In my opinion, this is the only Retainer Challenge Log worth doing and it will more often than not happen on its own even if you are simply doing the 18-hour Ventures once a day.
VENTURE BOTHERS
I truly don’t think anyone should strive for this Challenge Log unless they have paid for an extra Retainer on Mog Station. Essentially players will need to finish 15 of the 18-hour Ventures which is highly improbable with 2 Retainers and will significantly reduce a player’s income if they attempt to do it.
If you are a player with at least 3 Retainers and can only play for a maximum of 5 hours a day, this is easily acquired when you optimize the ventures you send your Retainers on.
GOLD SAUCER
I think I’m actually going to skip this section as I went tremendously in-depth with how to make the most MGP each week in the past. It utilizes these challenge logs as the primary source and realistically if you are going to use these Challenge Logs to boost your overall Challenge Log boost I’d be doing you a disservice by not telling you to read that post instead.
It outlines Challenge Logs you didn’t think you would be able to complete quickly, including the ones that can give you over 35,000 MGP a week for only 10 minutes of effort.
My husband has also outlined all of the GATEs in the Gold Saucer and how to easily succeed at them and what you need to know.
If there’s one section of the Challenge Log I strongly advise every player to take part in weekly it would be this one.
Leave a Reply