The time has come for me to fulfill my promise of teaching you the ways of utilizing Macros to set up your own Custom Menus.
For years I avoided Macros altogether, thinking that they were going to be too complicated for me to understand and not understanding how useful they could be. Yes, this even goes for Crafting, which I took part in daily for Tribal Quests and was long before lower-level crafts could be completed in 2-3 steps.
It wasn’t until this year when I got too fed up with how cluttered FFXIV’s UI felt and could no longer bear how bad it had become since I had started maxing out all of the Jobs in the game and had a few extra Hotbars for things like switching Jobs quickly, Food, Companion Chocobo Interactions and a few of my favourite Minions.
I know, I know so many of these things are quite useless to have since they are easy to access in the Menus already provided in the game, but I can easily blame my ADHD that both caused me to want to save time searching for these menus and for forgetting which sub-menu they all were in.
Admittedly, many of the “quick access” buttons I used to have I no longer use, such as individual Minions, but in their place I have not shockingly replaced them with other menus and options I use much more frequently now.
At first, I only used the 10 Hotbars that are made available to players by default, but as soon as I started my quest to max out all of my side Jobs and essentially became a full-time Crafter and Gatherer, I decided it was time to tap into the used Hotbars from Classes which turn into specialized jobs. The choice to use a Class Hotbar is only necessary if a player has too many things they want to easily access. Although more difficult to initially set up depending on how complicated you want your Menus to be, I would strongly recommend players utilize their extra Class Hotbars from the get-go since once the base coding is set up it’s extremely easy to copy it and use it for future menus you want to create.
I will still cover both methods in this post in case you’re someone who would rather keep things simple and don’t have many things you want to add and quite frankly, I use a mixture of both for my custom menus, simply out of laziness. I do plan on changing this in the future and only using Class Hotbars and will explain why I ended up in this situation and the cons you will experience if you utilize this method.
So, let’s get started and talk about how you can set up your custom menus in FFXIV. Since there’s a lot a player can customize it’s going to be quite a long-winded post. I’m also very open to suggestions on how to improve the system I use as well as questions about if certain elements of customization are possible.
Before I begin though, I would like to thank my husband who initially introduced me to the idea of custom menus and patiently sat by my side while I had meltdowns trying to figure out why certain things weren’t working.
Note: If you have any questions about FFXIV that you want me to cover feel free to leave them in a comment below, you can also ask me while I am streaming on Twitch, YouTube or in our community discord.
WHERE AND HOW TO SET UP MACROS IN FFXIV
To begin, players must familiarize themselves with the User Macros Menu. Funnily enough, I couldn’t remember where to access this menu while writing this as the way I usually access it is by utilizing a button I’ve made on a Custom Menu because this always happened to me.
*cough* Now that I’ve found it… there are two ways to access the Macros Menu. The first is in the System Menu to the bottom right of the screen, if you have not changed the default UI of the game and is depicted with an XIV. If you’re an oblivious person like me who missing things that are right in front of them, the User Macros button is just beyond the halfway down this menu, 5 spots above the bottom.
Players can also access all these Menus by hitting “P” on their keyboard to open the Actions & Traits Menu and will find the System Menu just above the word “Extras” as it is also depicted as an XIV.
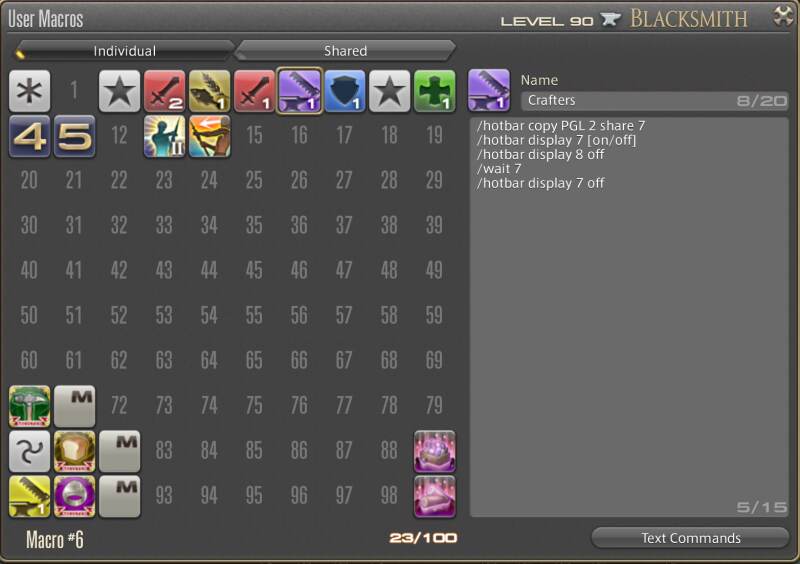
There are two sections in the User Macros interface which appear in both the Individual and Shared Tab. To the left, players will have 100 slots that are unique to each tab, meaning that players will able to make a total of 200 macros.
Individual Macros will only be accessible and displayed on the Character you are currently playing on, while Shared Macros are copied onto all of your characters no matter what Region, World or Data Center they are on.
I would strongly recommend that players segregate their Macros even if they don’t think they are going to have over 100 of them or aren’t planning on having an Alt. I initially thought I wasn’t going to have an Alt until I was asked to raid with friends in a different region and while many players who have Alts will simply copy and paste their files from one character to the other, having the Macros in the Shared Hotbar section will help speed up the smaller changes you make so you don’t constantly need to copy and paste your game files.
I would suggest the following structure: Custom Menus, Gathering Rotations, frequently used Crafting Macros and functionality Macros (such as timers or copy macros) go into the Shared Macros Tab, while more specific Macros such as unique Crafting Macros or Emote Rotations go into the Individual Tab.
Of course, at the end of the day which Macros go into which tab will highly depend on whether you have an Alt and how invested you are in your Alt, however, the segregation makes it so you can keep macros you no longer use as a reference without fretting running out of space.
Keeping old Macros is pretty important to me as I tend to forget the text commands that I previously used and while there is a button to the bottom right of the User Macros menu that documents what all these commands are and what they do, it’s generally very overwhelming especially when you gain access to more emotes and text commands.
Quite frankly, I always use the wiki as a reference when building new macros because it’s easier to search for the text commands you need.
Now, on the right-hand side of the User Macro interface, players will input text commands that will play in succession as if the player were typing them in their Chat Box.
Players only need to press enter once per line to set up their Macros, doing a double space will break the Macro and cause it to misbehave.
SETTINGS TO BE AWARE OF BEFORE YOU SET UP CUSTOM MENUS
Before you begin creating your own Custom Menus there are a few options you need to be aware of, particularly to do with Hotbar Sharing.
First, you’re going to want to set up which Hotbars are shared. Hotbar Settings can be found in the Character Configuration which is accessed in 3 ways. Either press “K” if you haven’t changed the default Keybind, head to the System Menu (the XIV button which by default is directly above your Gil) and select Character Configuration or hit Escape (ESC) and select Character Configuration.
Alternatively, players can also find this in their Action & Traits Menu by hitting “P” and clicking on the XIV above “Extras”. The reason I bring this up specifically is because this button can be dragged onto a Hotbar in case you want to create a custom System Menu. In my opinion, this is only worth it if you’re on Console, but even that feels a bit questionable.
Once you are in the Character Configuration Menu you will want to select Hotbar Settings, which is the second last button on the left and is depicted as the Cross Hotbar.
IMPORTANT DISPLAY MENU OPTIONS
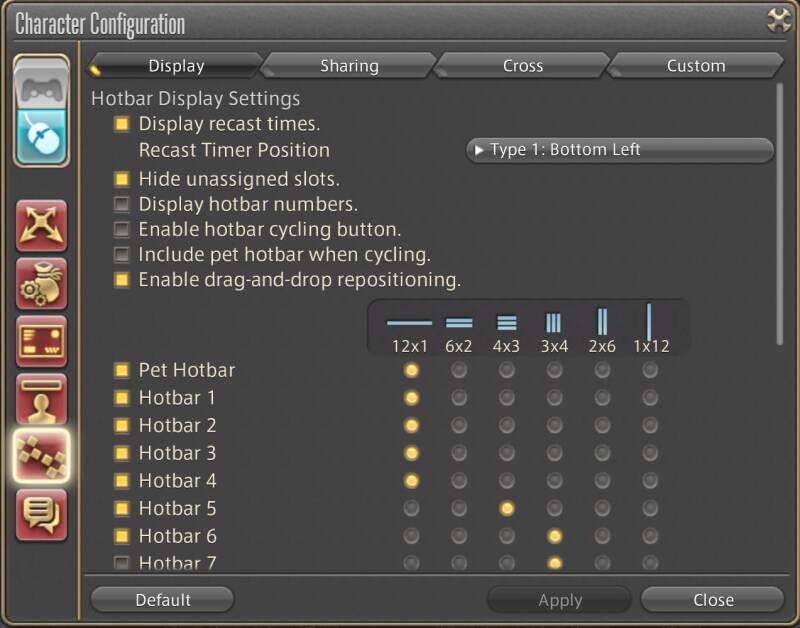
In the Display Menu, you will want to take note of the following settings:
Hide Unassigned Slots, which will make any of the slots with no skills or abilities completely disappear rather than being semi-transparent. At first, I was uncomfortable with this setting because it led to unpleasant-looking gaps on my Battle Job Hotbars, but it smooths out the look and feel of menu Hotbars and makes it so smaller sub-menus don’t look awful. If players ever try dragging and dropping a button with this option on, the unfilled slots will appear until the player releases the button.
Display Hotbar Numbers is a setting I’ve turned off. Although it can be useful when coding your macros, it can look pretty awful once you’ve set up your menus, especially if certain elements overlap. I would toggle this whenever you need it, but when you are done setting everything up, I strongly recommend turning it off.
The next section which is used to change the shape of Hotbars and make them visible or invisible isn’t necessary to take note of. There’s an alternative method to edit these, which I will talk about later, however, just be aware that these options can also be found here.
Take a look at the remaining options in case something piques your interest, however, they do not directly connect to our topic at hand.
SETTING UP SHARED HOTBARS
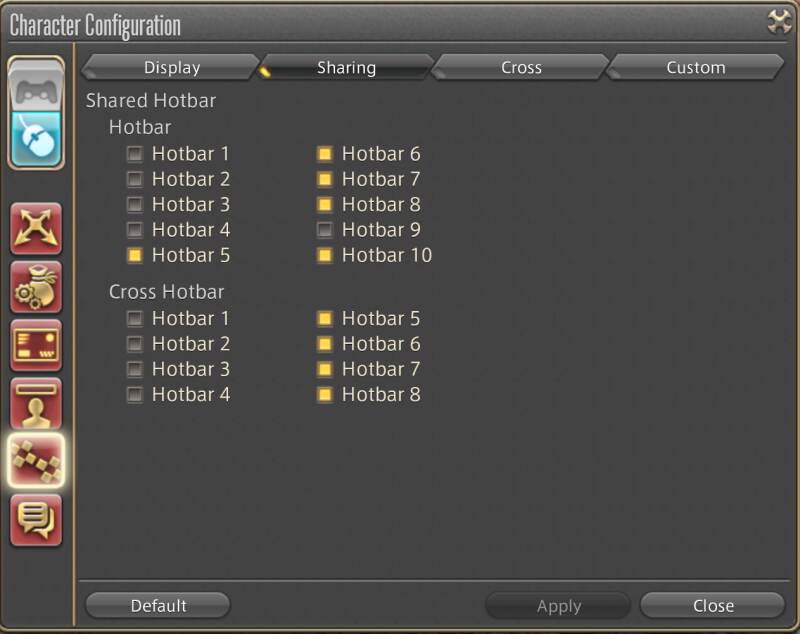
In the Sharing tab, players can choose to either make a Hotbar unique to each Job or have them shared among multiple Jobs. When the box is yellow, this means the Hotbar is classified as a Shared Hotbar.
Any Hotbar you are planning on using as a menu, whether it’s for the Macro buttons or the “shell Hotbar” if you choose to use Class Hotbars must be set to Shared.
The way I have things set up is that the first 4 Hotbars for my Jobs, the first three are for their Spells, Skills and Abilities and the fourth is for Jobs which have long GCDs on Buffs, Skills or Spells such as the Ninja or proc heavy Jobs like the Dancer. This is a large transparent display so I can see when these come off cooldown or proc, particularly for a tighter rotation in raids.
I would start the Shared Hotbars from the bottom up for cleanliness. So Hotbar 10 will be used for Macros while Hotbar 9 will be used for the Menu that opens up.
Initially, I only had one Macro Menu, but it’s been upgraded to 2 since I wanted faster access to more things, so for me, Hotbar 10 and Hotbar 8 are my static Macro Menus. I would try to be as organized as you can be with this because things can get confusing very quickly if you don’t keep track of them.
IMPORTANT MACRO/TEXT COMMANDS TO TAKE NOTE OF WHEN SETTING UP A CUSTOM MENU
Although I’ll give you a template for the Macros, the following are all the text commands that may be useful to you in case you want to further customize your Menus.
While my menus are pretty standard toggles that display and hide Hotbars, my husband has set up much more intricate menus that automatically change the HUD layout based on the menu type or the Job he is selecting.
When I was initially setting up my HUDs I didn’t plan on making the menus so complicated, especially because at the time I didn’t use different HUD layouts, however, as I continue to customize my game to my preference, I understand the utility and convenience of this.
/hotbar display with the number of the Hotbar you would like to change the display settings of
/wait # or <wait.#> after a /command with the # being how many seconds you want the macro to wait until executing the next line. If a wait is not added the next line will execute automatically.
/hudlayout # if you want to change which HUD layout you are using.
/micon or /macroicon if you want the Macro Icon to be an image that cannot be chosen by default. Information on how to select the right image can be found here.
/hotbar copy will copy the selected Hotbar to the Hotbar of your choosing. I will go more in-depth with this in the Class Hotbar setup.
Players should also be aware that they can make toggles with [on/off] or simply type on or off at the end of a macro.
HOW TO SET UP A BASIC MENU MACRO
Although I don’t recommend it if you’re a player who simply needs one or two menus maximum and are planning on just using shared Hotbars to do it, you simply need to use the following macro:
/hotbar display #
As I’m someone who often forgets to close my Hotbars I typically set them up as follows:
/hotbar display # [on/off]
/wait 7
/hotbar display # off
This makes it so players have the option to open and close a Hotbar at their will and if they forget it will close after 7 seconds. Players should note, that the menu will not close if they initiate another macro during this time or if they switch zones.
The biggest issue when it comes to using Macro Menus that are not bound to Class Hotbars is when you are utilizing multiple Shared Hotbars.
Say you are using Hotbar 10 for the Macro Buttons and Hotbar 7, 8 and 9 as Menus. If you press the Macros for each consecutively all three will display and must be closed manually. I can’t lie, I’m getting stressed thinking about how cluttered it was when I used to have my buttons set up like this.
Now, there is a solution, it just requires a bit more macro text.
Say you’re trying to display Hotbar 7, you’re going to want to make sure 8 and 9 are not displayed. Of course, substitute any of the Hotbars based on what you have set up. The command is going to look like this:
/hotbar display 7 [on/off]
/hotbar display 8 off
/hotbar display 9 off
/wait 7
/hotbar display 7 off
Now, for a normal person this isn’t a big deal, but for me who gets frazzled and stressed out easily coding this always was awful, even though I knew what I was doing.
As mentioned, I do use one Hotbar that follows this method and that’s because it is tied to hidden Keybinds such as Mounting and Sprinting. To my knowledge, there is no way around this using a Class Hotbar, but realistically you don’t need to have these on a Menu Hotbar unless you are planning on changing your Mount or the action tied to that Keybind.
HOW TO SET UP HOTBAR MENUS USING A BASE CLASS HOTBAR
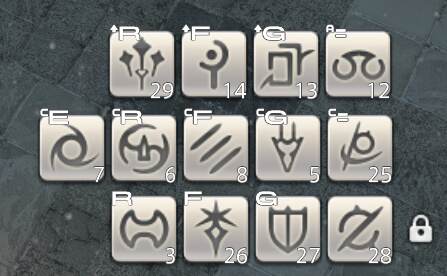 I can’t lie, I’m disappointed in myself for not using the Class Hotbar method to start. When my husband explained it to me and I first tried it out I got so overwhelmed I had to stop setting up my Hotbars.
There are a few different moving parts to this and I hope I can explain this in a clear concise manner.
To begin, players can utilize any Class that is not using a Job Stone. This is because a base Class uses a whole different HUD than the specialized Job. Options include:
Gladiator – GLA
Marauder – MRD
Lancer – LNC
Pugilist – PGL
Rogue – ROG
Archer – ARC
Thaumaturge – THM
Arcanist – ACN
Conjurer – CNJ
The Class you choose to set up your Hotbars doesn’t matter and you can always remind yourself of which Hotbar the Macros utilize by checking the actual macro.
Since I know 4 of my Hotbars will never be shared, I dumped my menus into 2 Classes. I currently have 7 custom menus, but have plenty of space if I want to make more.
STEP 1 – PLAN YOUR SUB-MENUS
I would strongly recommend that players begin the process by choosing what sub-menus they want. Forget the details of how they’re going to appear at first since there’s going to be lots of time for customization later.
Essentially for this step, you’re going to want to figure out what buttons you want to clump together. As I am someone who appreciates small UIs that don’t cover too much of my screen I have a good number of sub-menus, while my husband utilizes fewer macro buttons as he likes everything to appear at once.
All you need to do for this step is to think about what things you want to clump together. For example, you may either want to make segregated menus for each Role or have a single menu that lets you choose from any of the Jobs.
I would also recommend making a menu for frequently used buttons you don’t want to search for such as food, potions, emotes, or sub-menus like your Companion Chocobo or Alarms which would otherwise be a bit more difficult to find. For me, even if something takes the same number of clicks it is much easier for me to locate with an image instead of text.
I will provide you with some ideas for layouts and sample Macros in the following sections.
STEP 2 – PLAN YOUR HUD LAYOUT(S)
I would strongly recommend taking the next chunk of time to figure out how you want menus to display.
Ask yourself the following questions:
Do I want intricate menu systems that change the size and placement of Hotbars?
Do I want a simple interface that pulls up small menus?
Will I ever need two menus open at the same time?
How many Hotbars unused Hotbars do I have in my regular layout?
How many HUD Layouts do I currently use?
It’s important to answer all these questions before you get started since they will ultimately dictate the way you set up your Macros and give you parameters for what you can and cannot do.
The most important questions that directly dictate a player’s limitations are how many Hotbars and HUD Layouts they use. I use 3 HUD Layouts for different types of content. They go as follows:
A HUD Layout for casual content which moves most of the UI to the sides of the screen to avoid the feeling of clutter.
A HUD Layout for Healing / Raiding which moves my Party List closer to the center of my screen for quicker access and displays an additional large transparent Hotbar in the center of my screen to help me be more aware of Abilities/Skills that have a long cooldown.
A HUD Layout for Crafting and Gathering which moves and resizes various UI elements such as GP/CP, Status Effects/Buffs, and Mini Map and hides any UI I don’t need to see while performing these tasks.
My 4th HUD Layout is typically left unused, though I will sometimes use it when I make large changes to a sub-menus dimension. Since I use Hotbars 1-4 on a Base Class the dimensions are 12×1, but my shell menu is in a 3×4 orientation, making it a bit more difficult to plan out the display. So, in this HUD Layout, all the Hotbars I utilize are in the orientation that correlates to their shell. As I already use the 4th HUD as a visualizer for Menus it makes it more possible to use it for vanity Menus if I choose to make them.
Now, if players use all of their HUD Layouts for actual purposes they can utilize unused Hotbars to essentially do the same thing. I would recommend always having at least 4 Hotbars that are not Shared and save at least 3 Hotbars static menus. This leaves 3 Hotbars to be used freely on any of your HUD Layouts, meaning that even if you do use all 4 HUD Layouts regularly, you should still be able to make Vanity Menus, albeit with the risk of it feeling cluttered depending on what each of your HUD Layouts looks like.
Players who are simply using the 4th HUD Layout for vanity purposes have the luxury of hiding all UI elements if they so please. Of course, this is strictly up to the preference of a player.
At this point start by positioning the main menu which will house Macro Buttons and if you know where you want to place your sub-menus place them. Remember you can always change this, so don’t stress yourself too much if things don’t look perfect.
STEP 3- MAKE YOUR MAIN MENU THAT HOUSES MACROS
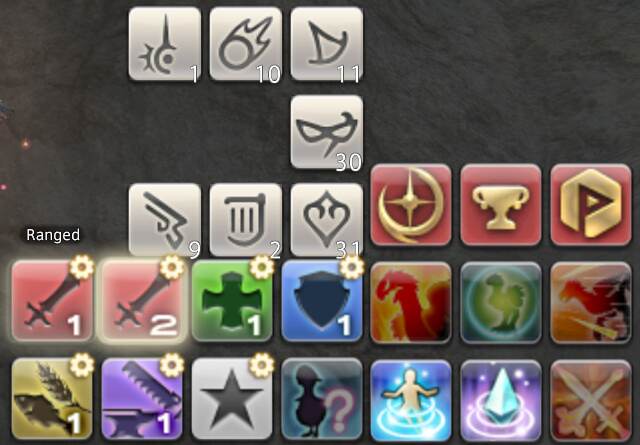 I would suggest you prepare the buttons you’re going to Macro before you set up the Class Hotbars. My reasoning for this is so you can test out menus while you’re making the actual Hotbar.
Realistically you can bounce between any of these steps at any point, but in terms of workflow I find doing this first makes things easier later.
When you’re initially setting up your Main Menu you don’t need to worry about the Macros. I would start by choosing the icons you would like to use and placing them into the position you want them to be in.
I’ll cover this again, but as a reminder, the text command you’re going to use is:
/hotbar copy (CLASS) ClassHotbar# share ShellHotbar#
When you are filling in the Class you can either use the full name of the Class or the acronyms listed above. I personally use the acronyms because they’re shorter to type.
An example of this macro goes as follows:
/hotbar copy LNC 1 share 7
/hotbar display 7 [on/off]
This will perform two actions in quick succession. first, it will copy the Lancer’s Hotbar to Hotbar #7 and then it will display the sub-menu you’ve created. This code is simply an on/off toggle which is the most popular among players.
I will cover alternative macros at the end of the post to give you ideas on how to further personalize your menus.
STEP 4 – SET UP YOUR MENUS ON BASE CLASSES
Now that you’ve started the placement of your main menus, it’s time that you switch to the Class you want to utilize. If you have already built some of your text command macros you’re one step ahead and it will make this part easier. If you have not, you will want to build them as you create the Class Hotbars.
To begin, get onto the Job you are planning on using the base class for and remove your Soulstone in the Character Tab (“C” by default). You do not need to save this as a Gear Set unless you want to further organize by naming the Gear Set whatever menu it is going to be.
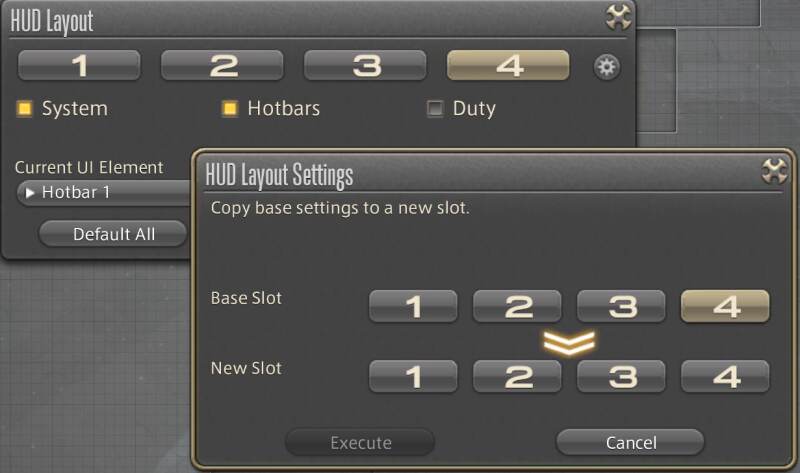
This is when I would recommend you use an extra HUD Layout if you have one, but make sure you copy the HUD Layout you have started setting up first. To copy a HUD Layout first hit Escape (ESC) then select HUD Layout and press the Gear next to the number 4. This will open a HUD Layout Settings Menu.
The Base Slot is the HUD Layout that is going to be copied while the New Slot is going to be the HUD Layout that is going to change.
After you’ve copied your HUD and have gotten on the Class you are going to be using the Hotbars for, I suggest you change the dimensions of the Hotbars you’re going to copy from to match the dimensions of the sub-menu that will appear. Then remove every single Skill and Ability on the Hotbar so it is clean.
Once you’re ready begin placing the buttons you would like to be on this menu. In many cases, you can just drag and drop the button onto the Class Hotbar, however, if you want something more complicated such as the HUD Layout to change when you choose a Job you will need to build a Macro for this. I also give examples of this at the end of the post.
Players should note that they can drag menus from the main menus at the bottom right corner of their screen, but they can also drag the buttons from their Actions & Traits (P) if this is easier. You will not be able to change the images of these buttons unless you make them a Macro, otherwise, they will appear as they do in the Actions & Traits menu.
If players want to place Potions or Food onto their menus, they will simply need to drag and drop it from their inventory. If players run out of either of these the image will still display but will be faded with the number 0 under it, otherwise it will just be a full-coloured image of the resource with the number of it you have.
This is your main opportunity to play around with the layout of your HUD, though remember if you move anything around you will have to change it on the other HUD Layouts. This is also an ideal time to test out your Macros to make sure they work.
Otherwise, you’re done!
A WARNING ABOUT SETTING UP MENUS
Although it may seem obvious to some players, it may not be obvious to all that any changes you make to the placement of buttons on a Hotbar must be made on the Base Class Hotbar.
While you will be able to physically drag and drop buttons to move them around on your Shell Hotbar, none of these changes will save. This is simply because the macro used to populate the Shell is only set to copy the Base Class Hotbar and is not the actual Hotbar itself. Players may notice this quickly if they open and close a menu, which is why I like the idea of building and testing a menu in its own HUD Layout.
If you’re someone who regularly makes mistakes and thinks you’re going to have to go back multiple times to fix something, I would strongly suggest saving the Base Classes you’re going to use as a new Gear Set. Since you can rename Gear Sets to whatever you’d like, it will be much to remember the Classes used and you can avoid the extra step of having to take off your Job Stone. It also makes it so you don’t have to sift through all of your Macros even though that is generally easy.
There is no way to avoid this since a copy macro can only affect the Job or Class you are currently on. What I mean by this is that players can copy Hotbars from a Job/Class they are not currently playing on, but cannot transfer Hotbars to another without first switching onto it. While frustrating, it’s understandable that text commands will have their limitations.
MENU LAYOUTS, MACROS AND IDEAS TO TRY
I’m sure this list is going to grow, especially as I start thinking about redesigning my own menus. Remember things can be as complicated or simple as you want them to be and you can realistically make 36 menus if you have 4 Hotbars set to not be shared. I’ll admit this is a bit overkill, but the option is there.
The nice thing about these menus is that you don’t need to have the Classes unlocked on your Alt as long as you copy and paste your main character’s Hotbar configuration over. This is simply because the game is simply pulling up the information from your game files and is not paying attention to whether you have played them on the character before. This is also why it is possible to share your Hotbars with another player or why transferring Hotbars will allow you to see the icons for Skills/Abilities you have yet to unlock.
Now, this isn’t unique to only Class Hotbars as if you have set up regular Shared Hotbars these will function in the same manner. It’s just nice to know that you don’t need to unlock Classes you don’t want to play on an Alt.
To my knowledge, there is no ideal way to set up Hotbars for Classes you haven’t unlocked on any of your characters. There may be a way to alter files to change their identities, however, this would overcomplicate the task in my opinion.
TEXT COMMAND MACRO FOR STANDARD SHARED HOTBAR MENU
I’m going to start with the basic text command for a Standard Shared Hotbar Menu. Although not necessary, as mentioned I use a single Shared Hotbar Menu for things that require Keybinds such as Sprint and Run. The risk of using a Class Hotbar that requires a copy function is quite obvious, there’s a chance you’re going to forget to revert it.
While you can hide regularly used Keybind on one of the Hotbars you are never going to use, I prefer this because it doesn’t waste a full Hotbar for a couple of buttons. If you think you may do the same, I would recommend you make this your “Potions, Food and Misc.” Hotbar since chances are that one won’t be filled with 12 buttons.
When I first started playing XIV I had these buttons on each of my Job’s Hotbars, but as more expansions come out and Jobs gain Skills/Abilities it’s becoming harder to organize Hotbars in a manner that’s clean and concise. Honestly, some Jobs make it nearly impossible such as the Gunbreaker which has a shocking number of buttons for a Tank.
Since I have two types of Menus, one being a Class-copied Shell Hotbar and the other being this Shared Hotbar, I personalized my Text Command to hide the Shell Hotbar when the Shared Hotbar is opened. This makes it so both do not appear at the same time and doesn’t lead to an awkward battle of clicking multiple buttons to close the menus.
My Text Command goes as follows with Hotbar 8 being the standard Shared Hotbar and Hotbar 7 being the Class-based Shell Hotbar:
/hotbar display 8 [on/off]
/hotbar display 7 off
/wait 7
/hotbar display 8 off
You do not need to add the wait command and beyond if you simply want this to be a toggle.
TEXT COMMAND A MENU THAT UTILIZES MULTIPLE HOTBARS
Though I do not currently use a Macro that pulls up multiple Hotbars at once, it can be particularly useful for a menu that lets you change Jobs. At the moment my Job menus are segregated by Roles, but I’m starting to think about changing this soon.
Now, since there are a good chunk of Jobs in the game there may be two ways you want to divide this. Either you put every single Job in the game on three Hotbars or you segregate them by Battle Class Jobs and Crafters and Gatherers.
I would recommend segregating the Menus since it can provide you more room to customize your layout without the need to tap into another HUD Layout. Let’s go under the assumption that you are using 3 Hotbars for Static Menus, 4 for your Jobs and 3 as Shell Hotbars. If you want your Job Switching Menu to appear in a completely different location than the regular menu you can simply set aside two Hotbars just for Jobs, while if you used 3 Hotbars for Job switching you would have to create a Text Command that both displays these Hotbars and changes the HUD Layout you’re currently in.
While both are simple to set up, the choice will ultimately be based on the questions I had you answer earlier in the post. I, for example, would rather not have HUD Layouts switch for Menus and instead would rather use them for other purposes.
Since you’re probably only going to run into this when you’re building your Job switching menu, here are some numbers to keep note of:
There are currently 20 Battleclass Jobs and 11 Crafters & Gatherers meaning you need 31 Hotbar spaces. As mentioned, this means you need a minimum of 3 Hotbars as this provides you with 36 slots, giving you 5 spots to spare.
Though this is true now, with the addition of the two new Jobs in Dawn Trail and the potential for a Limited Job, similar to the Blue Mage, you’re only going to be left with only 2 slots available. This is another reason I encourage the segregation of Crafters and Gatherers.
Planning for the future can come in handy, especially if you are someone who generally makes backups of their files to transfer onto new devices. Though this wasn’t as big of a priority for me in the past, since making these custom menus there’s no doubt I’m going to hold onto my save files for when I get a new PC.
I digress, the text command for this would go as follows, assuming you are using a Class Hotbar since there are simply far too many buttons otherwise. This template uses the Lancer as the Base Class and Hotbars 5 & 6 as the Shells.
/hotbar copy LNC 1 share 5
/hotbar copy LNC 2 share 6
/hotbar display 5 [on/off]
/hotbar display 6 [on/off]
/wait 7
/hotbar display 5 off
/hotbar display 6 off
Again, if you don’t need this menu to auto close you don’t need to use the wait function and beyond.
“CLOSE MENU” BUTTON
Players may want to create a Fail Safe or a Close Menu button. This is typically the preferred method of setting up custom Menus as it rids players of the need for on/off toggles.
At first, an on/off toggle may seem like a blessing, especially if you are used to only used to using Shared Hotbars, but they are somewhat problematic when you use a Shell Menu. Now, this isn’t that big of a deal and is merely an appearance problem, but if you try to cycle through menus that use a Shell Hotbar each time you press the next button it will force the menu to close. Don’t worry, nothing is broken or harmed, but for some reason instead of treating it like you’re starting a new toggle, it finishes the toggle off.
The other circumstance a “Close Menu” button is useful is when the Menu you’ve chosen to open changes your HUD layout.
Nonetheless, this is a button you can create that will force all sub-menus to close and you can simply create one Macro that hides all Hotbars that aren’t your main menu for ease. I’m sure you guessed it, it’s just:
/hotbar display 5 off
/hotbar display 6 off
/hotbar display 7 off
There’s no problem pressing this Macro even if a Hotbar isn’t open as… well… it won’t do anything!
“BACK” BUTTON
A very niche format to set up your Menu is to have every single Menu be a copy of a Class Hotbar. I don’t like the aesthetic of it, but it can be extraordinarily useful for players who like everything in one spot or simply want to free up more Hotbars for Menus.
With this method, you only need to use 1 Shared Hotbar and can have the remaining 9 be unique to each Job/Class, however, it is important that you set up the base menu on one of your Classes.
Essentially, for this to work, each time you press a button it will execute a copy command that points to another Class Hotbar. You will just need to make sure that every Hotbar you create always has the Macro that leads back to the start. The only time you wouldn’t need this is if you have a menu that leads into other menus, though it might still be a good idea to have a button that leads back to the start for ease if you have the space.
Three macros to think about are a Back, Forth and Start and have them each point to the associated Class Hotbar. The only limitation to this is going to be the number of Macro slots you have access to.
If you make a mistake or ever get stuck in a menu, head into your User Macros and right-click on the Macro to Execute. If you’re not using all 9 Hotbars, you can also set up one of the Hotbars to be shared and only have this Macro on it as your fail-safe. This can come in handy if your Macro misbehaves and can be tucked somewhere auspicious on your screen.
This method will only use the following format:
/hotbar copy LNC 1 share 10
JOB SWITCHING BUTTON THAT ALSO CHANGES HUDS
This is a more complicated Macro and can break on an Alt if you switch anything on your main, but forget to copy it over. Essentially, instead of dragging and dropping your Gear Sets onto Hotbars, you’re going to have to set up Macros to switch Gearsets.
It will require a lot of patience, but the hope is that you’re going to find a lot more fluidity in switching Jobs and not have to do the clunky task of manually changing your Hud Layout.
Alternatively, you can simply make the HUD Layout Macro a button, but it’s not going to be as smooth.
To begin, make sure you’re documenting what Jobs are associated with every single Gear Set. If you ever change the number a Gear Set is associated with going forward, you will break your Macro and will have to rewrite the Text Command.
Say the Gearset you want to use is 12 and the HUD Layout you want to use is 4, your command would look as follows:
/hudlayout 4
/gs change 12
Alternatively, you can use /gearset change if that is easier to remember.
This is the method I’m going to utilize in the future, now that I’m regularly switching what HUD Layout I use based on the tasks I’m doing. I have to admit, I’m getting tired of forgetting that I’m in my Crafting HUD Layout when a Duty pops and the whole interface is covering my screen.
CHANGE HUD LAYOUT WHEN SELECTING A MENU
Just so I can say I’ve covered it if you are using HUD Layouts to change the positioning of a Menu instead of using unused Hotbars your command would look something like this:
/hudlayout 4
/hotbar copy LNC 1 share 6
/hotbar display 6
Leave a Reply